Setting up a queue service: Django, RabbitMQ, Celery on AWS
In this post, I’ll walk you through the process of setting up a jobs-queueing infrastructure, using Django, Celery, RabbitMQ, and Amazon Web Services. While building this system, I found that there was good documentation for each different component, but relatively little on how to fit the pieces together.
First, let’s discuss the motivation of this project. We have a Django project deployed on AWS OpsWorks. The stack is broken into two layers:
- The internet-facing app layer, where the Django project is run in conjunction with Nginx and WSGI to serve HTTP requests from the outside world.
- The internal-facing jobs layer, containing the same Django code, but which runs cron jobs and other long-running, CPU-intensive processes.
The app’s user base is growing, and there is pressure to make the app more performant. There are many operations performed by the app servers which take place within the context of a single request, but which could easily be performed separately, allowing the request to be completed faster.
Unfortunately, Django does not come out-of-the-box with support for this sort of delayed execution – a request is received, operations are performed, and a response is returned (the request-response cycle). There are no long-running processes outside of requests and response. Something else is required.
Here we see the value of a piece of infrastructure known as a “queue”. A queue is, as it sounds, a system for “lining up” tasks for later execution. Processes send tasks to the queue during the course of a request-response cycle, and elsewhere these tasks are carried out by “workers”. A queue system allows for time-intensive but non-critical tasks to be offloaded from the internet-facing servers, bringing better performance.
Additionally, we want our system to be easily deployable, and flexible enough to accomdate the addition or removal of servers from either the app or jobs layers of the project.
The queue system we are going to build consists of four parts:
- Django, the popular Python web framework.
- RabbitMQ, an enterprise-grade messaging platform.
- Celery, a python library which sits on top of RabbitMQ and provides workers to execute tasks.
- AWS OpsWorks, Amazon’s infrastructure-management product.
We will begin with the server and network aspects of this service, and then turn to configuration and deployment.
For this tutorial, we will consider a deployment in which there is one EC2 instance in each layer. Towards the end, we will discuss the addition of multiple instances to both layers.
Step 1: Install RabbitMQ
RabbitMQ is the messaging server which powers this service. Written in Erlang, RabbitMQ does the following:
- Listens for messages sent via the AMQP protocol.
- Stores these messages in one or more queues.
- Releases these messages to workers for consumption and processing.
Note that RabbitMQ does not actually execute tasks. Rather, it is the mechanism by which tasks (“messages”) will be sent between instances and stored until executed.
The first thing we will do is install RabbitMQ on our jobs instance. SSH into your instance and run the following:
ubuntu@jobs:~$ sudo apt-get install rabbitmq-serverNow, lets check to make sure that RabbitMQ is up and running:
ubuntu@jobs:~$ sudo rabbitmqctl status
Status of node 'rabbit@jobs' ...
[{pid,1087},
 {running_applications,[{rabbit,"RabbitMQ","3.2.4"},
                        {mnesia,"MNESIA  CXC 138 12","4.11"},
                        {os_mon,"CPO  CXC 138 46","2.2.14"},
                        {xmerl,"XML parser","1.3.5"},
                        {sasl,"SASL  CXC 138 11","2.3.4"},
                        {stdlib,"ERTS  CXC 138 10","1.19.4"},
                        {kernel,"ERTS  CXC 138 10","2.16.4"}]},
 {os,{unix,linux}},
 {erlang_version,"Erlang R16B03 (erts-5.10.4) [source] [64-bit] [async-threads:30] [kernel-poll:true]\n"},
 {memory,[{total,34656304},
          {connection_procs,2632},
          {queue_procs,5264},
          {plugins,0},
          {other_proc,13257200},
          {mnesia,57952},
          {mgmt_db,0},
          {msg_index,30568},
          {other_ets,744920},
          {binary,7080},
          {code,16522377},
          {atom,594537},
          {other_system,3433774}]},
 {vm_memory_high_watermark,0.4},
 {vm_memory_limit,1572403609},
 {disk_free_limit,50000000},
 {disk_free,4563763200},
 {file_descriptors,[{total_limit,924},
                    {total_used,3},
                    {sockets_limit,829},
                    {sockets_used,1}]},
 {processes,[{limit,1048576},{used,122}]},
 {run_queue,0},
 {uptime,2732}]
...done.
Excellent.
Let’s set up our user. RabbitMQ comes with a “guest” user out of the box, but this user is not configured to accept external requests. This would be fine if you were planning on sending and consuming messages locally, but we are not.
The easiest way to configure RabbitMQ to accept external requests is to create a new user. Go ahead and run the following (angle brackets denote user values):
ubuntu@jobs:~$ sudo rabbitmqctl add_user <username> <password>
ubuntu@jobs:~$ sudo rabbitmqctl set_permissions -p / <username> ".*" ".*" ".*"
This will create a new user on the RabbitMQ server. We will use this username and password to configure the app-layer instance to send messages to Rabbit.
Let’s check to make sure the user was created correctly:
ubuntu@jobs:~$ sudo rabbitmqctl list_users
Listing users ...
guest   [administrator]
<username>  []
...done.
Finally, let’s start our first worker process. A RabbitMQ server is useless unless there are workers (processes) configured to consume its messages.
Navigate to the root directory of your project (if you’re not there already), and run the following:
ubuntu@jobs:~$/you_proj$ celery -A <your_proj> worker -l INFOYou should see an output like this:
 -------------- celery@jobs v3.1.17 (Cipater)
---- **** -----
--- * ***  * -- Linux-3.13.0-24-generic-x86_64-with-Ubuntu-14.04-trusty
-- * - **** ---
- ** ---------- [config]
- ** ---------- .> app:         your_proj:0x7f6fab1d2810
- ** ---------- .> transport:   amqp://<username>:**@jobs.your_proj.com:5672//
- ** ---------- .> results:     cache+memcached://cache.your_proj.com:11211/
- *** --- * --- .> concurrency: 1 (prefork)
-- ******* ----
--- ***** ----- [queues]
 -------------- .> default          exchange=default(direct) key=default

[tasks]
  . tasks.add

[2015-05-15 03:42:59,653: INFO/MainProcess] Connected to amqp://<username>:**@jobs.your_proj.com:5672//
[2015-05-15 03:42:59,675: INFO/MainProcess] mingle: searching for neighbors
[2015-05-15 03:43:00,740: INFO/MainProcess] mingle: sync with no nodes
[2015-05-15 03:43:00,740: INFO/MainProcess] mingle: sync complete
[2015-05-15 03:43:00,785: WARNING/MainProcess] celery@jobs ready.
This is the celery worker outputting to STDOUT. At this moment, any message received by the RabbitMQ server will be consumed by this worker, and the result printed to the screen. In production, you will wanto to run these workers in the background. You can background a task in a simple way by appending & to the command. For a more complete solution, it is worth using a tool such as supervisor.
That will be enough for now. Much more info on setting up RabbitMQ for Celery can be found here.
Step 2: Configure AWS
So, RabbitMQ is now up and running. But it not yet possible to send messages between the layers of our project. We will need to make a number of modifications to the stack:
- Update the settings for the stack’s security group
- Create an Elastic Load Balancer (ELB) for the jobs layer.
- Create a stable DNS address for the ELB.
RabbitMQ servers communicate via AMQP, a popular messaging protocol. In order for your stack layers to be able to communicate with each other, you’ll need to update that stack’s security group (if you have one) to allow this traffic.
Security Groups
If you have never worked with security groups, they are an AWS feature which makes it easy to secure groups of instances (EC2, RDS, and so on) by restricting the ports and protocols through which they can communicate to the outside world (or to each other).
AMQP is an application-layer protocol, and as such can be transmitted via TCP, a lower-level transport-layer protocol. This means we will need to update our security group to open up a port for TCP traffic.
Navigate to AWS Services -> EC2 -> Network & Security -> Security Groups. You will want to add a new “rule”, allowing TCP traffic to come through on port 5672 (the RabbitMQ default). For now, let the connection come from “anywhere”.
Your setting should look something like this:

Great. Now you can send messages between your app layers. Currently, though, you’ll need to use the exact address of your jobs server to send messages. This is disadvantageous, as you will have to update your settings every time that address changes (i.e., every time you deploy a new instance). It would be much better to create a persistent address to receive messages, which will remain the same even as the servers themselves change. Enter the “load balancer”.
Load Balancers
Load balancers are barriers placed between a group of your servers and any computers which they will need to interact with. The load balancer receives all requests, and routes them to one of its servers. This provides a single point of contact for your client-facing servers, abstracting away the individual instances.
To create a new load balancer, navigate to:
AWS Services -> EC2 -> Network & Security -> Load Balancers
Hit the big blue button labeled Create Load Balancer
Set up the load balancer (hereafter LB). The following settings should be good (you can leave everything else to default):
- Define Load Balancer:
- Name:
'<stack>-JOBS' - LB Protocol:
TCP / 5672 - Instance Protocol:
TCP / 5672
- Name:
- Configure Health Check:
- Ping Protocol:
TCP / 5672
- Ping Protocol:
- Add EC2 Instances:
- Here you can add all the instances currently running in the relevant layer of the OpsWorks stack. In our case, there is only one server,
jobs, to add.
- Here you can add all the instances currently running in the relevant layer of the OpsWorks stack. In our case, there is only one server,
- Add Tags (can ignore for now)
- Review
You should see something like this:

If you’re curious, what we’ve done is tell the load balancer to receive and re-route TCP requests coming to port 5672 to the same port on one of the jobs instances. We’ve also told it to repeatedly ping the servers it is associated with to make sure they’re still alive (a “health check”). AWS load balancers will remove “unhealthy” instances (those which repeatedly fail the health check), to ensure that requests are going to a valid server.
Congratulations! You’ve created a load balancer. Navigate to the “Description” tab and make a note of the LB’s “A Record”. This is the address that you can use to send messages your jobs server. This address will be permanent, meaning you can add it to your Django settings without having to worry about updating it later – this address will remain constant, even as you add and remove individual instances.
But, it’s a pretty ugly URI. It would be a lot nicer if we could assign it to something more semantic and human-readable. Fortunately, we can! AWS has a DNS product called Route 53 which allows you to assign easy, clear domain names to otherwise-confusing IP addresses.
Go ahead and navigate to:
AWS Services -> Route 53 -> Hosted Zones -> <your hosted zone>
From here, click the big blue button Create Record Set.
You’ll see a settings box pop up on the right of your screen. All we’re doing here is setting the human-friendly URI for your load balancer. Pick your name, and then paste your load balancer’s A Record (remember that) into the “Value” box. Make sure you set “type” to CNAME, because you’re creating a relationship between two DNS records, not between an IP address and a DNS record (in which case you would use A - IPv4 or AAAA - IPv6 ). Leave everything else to default and hit Create.
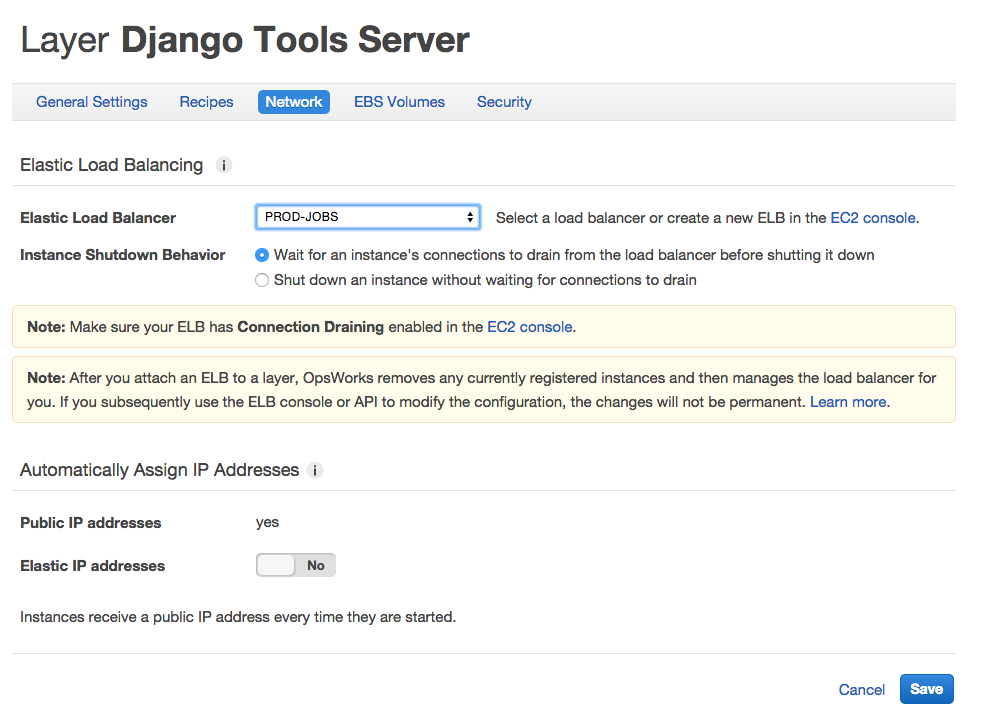
Finally, we have to add this LB to the OpsWorks layer. First, navigate to: AWS Services -> OpsWorks -> <your stack> -> Layers -> <your tools layer> -> Network.
You should see something that looks like this:
Alright! Let’s take stock of where we are. We’ve:
- Gotten RabbitMQ running on a jobs server.
- Set up some AWS layers to protect and stabilize our stack.
- Taught our servers to play nicely together.
Now we turn away from AWS and back to our actual app.
Step 3: Setting up Django and Celery
Let’s crack open our settings.py file and add some Celery:
BROKER_URL = 'amqp://username:password@jobs.yoursite.com:5762//'The final slash in that URI refers to a RabbitMQ virtual host. The default vhost is /, hence the //, but this could in theory be different for more advanced deployments. Don’t worry about this right now, but remember it in case you come across something different in the future.
That’s all you’ll need to teach Celery to talk to Rabbit. The nice thing is that you’ll never have to change this setting, even as you add/remove jobs servers. Load balancers!
Celery itself will be defined in a file we’ll call your_app/celery.py, which will look something like this:
from __future__ import absolute_import
import os

from celery import Celery

os.environ.setdefault('DJANGO_SETTINGS_MODULE', 'your_app.settings')
app = Celery('your_app')
app.config_from_object('django.conf:settings')
Our Celery tasks themselves will be defined in a file called tasks.py:
from your_app.celery import app as celery

@celery.task
def add(x, y):
    return x + y
You can then call these tasks:
>>> import tasks
>>> tasks.add(3,5)
8
>>> tasks.delay.add(3,5)
<AsyncResult: 2e031f3f-5284-48cb-bb57-fcef3638c746>
What has happened here is that the @celery.task decorator has given add the delay property, a function which wraps the Celery API to allow for easy queuing of tasks. While calling your_func(*args, **kwargs) will execute the task immediately, calling your_func.delay(*args, **kwargs) will queue the same task for later execution.
Thinking about the last couple of steps, consider how we:
- Communicated to the Django project the location of the RabbitMQ server, and how to communicate with it.
- Defined a Celery application, with configuration information telling it the location of the Django project settings.
- Wrapped your function of interest with Celery’s
taskdecorator, which informed Celery of the task and its code, and gave the function some additional properties. - Used one of the properties defined by Celery to easily send the task to the queue.
And with that, the system is complete!
Step 4: OpsWorks
Amazon OpsWorks is an invaluable tool for managing infrastructure requiring the coordination of multiple independent servers, or “nodes”. One of the great features of OpsWorks is the ability to upload Chef “recipes” to any stack and configure them to be run at various points in the lifecycle of the instances in that stack.
Let’s consider how we can apply Chef recipes to the challenge of our new infrastructure. For the system to be “complete”, let’s say we want the following:
- A RabbitMQ server up and running, and able to receive external requests
- One or more Celery workers running, and able to consume messages from one or more queues
We want this system to be resilient to failure and to operator error, meaning we want to automate as much as possible, including:
- Installing RabbitMQ if it is not found
- Creating the correct users/permissions on the RabbitMQ server
- Correctly starting the Celery workers
- Restarting the Celery workers in case of failure
Fortunately, all of this can be accomplished via Chef recipes! Here are the two cookbooks we will be considering:
cookbooks/

  rabbitmq/
    recipes/
      default.rb

  supervisor/
    attributes/
      default.rb
    recipes/
      default.rb
      celery.rb
First, let’s consider the one-recipe cookbook for RabbitMQ:
cookbooks/rabbitmq/recipes/default.rb
package 'rabbitmq-server'

service 'rabbitmq-server' do
    action [:enable, :start]
end

def user_exists?(name)
  cmd = "rabbitmqctl -q list_users |grep '^#{name}\\b'"
  cmd = Mixlib::ShellOut.new(cmd)
  cmd.environment['HOME'] = ENV.fetch('HOME', '/root')
  cmd.run_command
  Chef::Log.debug "rabbitmq_user_exists?: #{cmd}"
  Chef::Log.debug "rabbitmq_user_exists?: #{cmd.stdout}"
  begin
    cmd.error!
    true
  rescue
    false
  end
end

unless user_exists?(<username>)
    execute "create-user" do
       command "sudo rabbitmqctl <username> <password>"
    end
end

execute "set-permissions" do
   command 'sudo rabbitmqctl set_permissions -p / <username> ".*" ".*" ".*"'
end
Here we have four “resources” (the individual actions/goal-states that a recipe will take/bring about). These resources, do, in order:
- Install RabbitMQ if not already installed
- Start the RabbitMQ server if it is not already running
- Create your user if it does not exist
- Configure permissions for your user
You have almost certainly noticed the large Ruby function sitting between resources 2 and 3. This function exists to make the recipe “idempotent”, so that repeatedly running the recipe will not cause a failure. More advanced Chef usage would involve breaking these type of helper functions off into a seperate module, but in this case having all of the logic presented together seems instructive.
Now, let’s turn to the recipes for managing the Celery workers. Here, we seen example of a more fully-featured cookbook, used to control the Supervisor service (which is what we will be using to manage our Celery workers). Cookbooks like these can often be found online, and are often mature and fully-featured.
Peeking into cookbooks/supervisor/attributes/default.rb, we discover a settings module used to store configuration for the entire cookbook:
default['supervisor']['unix_http_server']['chmod'] = '700'
default['supervisor']['unix_http_server']['chown'] = 'root:root'
default['supervisor']['inet_port'] = nil
default['supervisor']['inet_username'] = nil
default['supervisor']['inet_password'] = nil
normal['supervisor']['dir'] = '/etc/supervisor.d'
normal['supervisor']['conffile'] = '/etc/supervisord.conf'
default['supervisor']['log_dir'] = '/var/log/supervisor'
default['supervisor']['logfile_maxbytes'] = '50MB'
default['supervisor']['logfile_backups'] = 10
default['supervisor']['loglevel'] = 'info'
default['supervisor']['minfds'] = 1024
default['supervisor']['minprocs'] = 200
default['supervisor']['socket_file'] = '/var/run/supervisor.sock'


# Celery
default['celery']['project'] = "<your_proj>"
default['celery']['workdir'] = "<path/to/your_proj>"
default['celery']['log_directory'] = "/var/log/celery"
default['celery']['log_path'] = "/var/log/celery/worker.log"
default['celery']['log_level'] = "INFO"
Turning to supervisor/recipes/celery.rb, we see the specific resources controlling Celery:
# Add the celery log folder
directory node['celery']['log_directory'] do
  owner node[:user]
  group node[:group]
  mode 0766
end

supervisor_service "celery1" do
  action [:enable, :start, :restart]
  autostart true
  autorestart "unexpected"
  user node[:user]
  directory node[:celery][:workdir]
  command "/usr/local/bin/celery -A #{node[:celery][:project]} worker -l #{node[:celery][:log_level]} -Q high -n worker1"
  stdout_logfile "/var/log/celery/worker.log"
  stderr_logfile "/var/log/celery/worker.log"
end

supervisor_service "celery2" do
  action [:enable, :start, :restart]
  autostart true
  autorestart "unexpected"
  user node[:user]
  directory node[:celery][:workdir]
  command "/usr/local/bin/celery -A #{node[:celery][:project]} worker -l #{node[:celery][:log_level]} -Q high,default -n worker2"
  stdout_logfile "/var/log/celery/worker.log"
  stderr_logfile "/var/log/celery/worker.log"
end
This recipe, when run, will create the Celery log folder (if it does not exist), and start or restart two Celery workers process under Supervisor’s control. Notice how worker1 is set up to consume only from the high priority queue, while worker2 is set up to consume from both high and default priority queues. Celery does not support explicit queue priority, but by allocating workers in this way, you can ensure that high priority tasks are completed faster than default priority tasks (as high priority tasks will always have one dedicated worker, plus a second worker splitting time between high and default).
This recipe is also idempotent, in that repeated executions of the recipe will restart any running workers, or start them if they are not running.
Returning to OpsWorks, we have to now assign each recipe to a different lifecycle stage. EC2 instances managed by OpsWorks have a “lifecycle” consisting of five stages:
- Setup (recipes run when the instance is first launched)
- Configure (recipes run whenever a new instance comes online in a layer)
- Deploy (recipes run whenever deploying updated code for your app)
- Undeploy (recipes run whenever undeploying or removing an app)
- Shutdown (recipes run when shutting down an instance)
In our case, we will add the rabbitmq::default recipe to the Setup stage, and the supervisor::celery recipe to the Deploy stage. We do this because the RabbitMQ configuration needs to occur only once in the instance’s lifecycle (although the recipe is written in such a way that repeated runs will not fail). The Celery workers, on the other hand, must be restarted every time the app is updated (since a Celery worker knows the app code at the time it was started – a worker must be restarted to include any code changes).
With these two recipes, we have set up our jobs layer to be able to correctly launch and configure an instance, without requiring any manual intervention. This means we can easily scale up our queue system to two, four, or a dozen instances without any additional work. The combination of the load balancer and our recipes will cause the work to be distributed evenly across all instances. If an instance were ever to fail, it would automatically be removed from the load balancer, and we can easily launch another instance to take its place.
Step 5: Inspecting
There are a number of commands and tools you can use to help you get a view on the behavior of your queue system.
Worker statuses:
ubuntu@jobs:/your_proj$ celery -A <your_proj> status
celery@worker1: OK

1 node online.
Listing worker processes:
ubuntu@jobs:/your_proj$ ps -aux | grep celery
ubuntu    7493  0.1  1.5 156712 61144 ?        S    14:14   0:01 /usr/bin/python /usr/local/bin/celery -A <your_proj> worker -l INFO -n worker1
ubuntu    9937  0.0  0.0  10460   932 pts/0    S+   14:32   0:00 grep --color=auto celery
Listing queues, number of messages, and number of workers consuming from them:
ubuntu@jobs:/your_proj$ sudo rabbitmqctl list_queues name messages consumers
Listing queues ...
default 0   1
celery@worker1.celery.pidbox    0   1
celeryev.d316d5d8-3a7c-4a35-9008-568844baec08   0   1
...done.
Also highly recommended is “flower” (pronounced flow-er), a web-based dashboard for reviewing workers, recent tasks, and performance metrics. To start flower, run the following command:
ubuntu@jobs:/your_proj$ celery -A <your_proj> flower --address=0.0.0.0 --port=5555Assuming you are running this command from an EC2 instance (and that the instance is able to receive external http requests), you can access flower (specifically, view the last 100 tasks) via a web browser via the following URI:
http://<instance IP address>:5555/tasks?limit=100Final Thoughts
We’ve covered a lot of ground with this post, but as with everything in software, there’s miles more left to travel. Some things not discussed:
-
Splitting RabbitMQ from Celery. Currently, we conceive of RabbitMQ and Celery as being a single unit, with separate instances isolated from each other. More sophisticated setups would seperate these, with one or more instances devoted solely to hosting RabbitMQ instances (which can be joined together to form a “cluster”, providing additional fascinating capabilities). Currently, messages are isolated to the jobs instance which first recieved them. If a jobs instance were to go down, all message already recieved (but not yet processed) by that instance would be lost. If your application can tolerate lost messages, then this may be alright. If you cannot, then you should pursue more advanced configurations in which messages are replicated across RabbitMQ instances in a cluster.
-
Configuring flower to run continually, accessible with a username and password. It would not be particularly difficult to keep flower running constantly (perhaps under Supervisor control), accessible via a stable URI and requiring a username and password. This would make it much easier for the entire DevOps team to check on the health of the queue at any time.
Hopefully this has been a helpful guide. Building infrastructure is a very, very exciting part of creating software – infrastructure defines the possibilities for what your app can do, and so new infrastructure unlocks possibilities in a way that code by itself rarely does. Please let me know in the comments or via email if there’s anything I’ve left out or you’d like me to expand upon.